
Attic Drywall Installation in St. Albert, AB
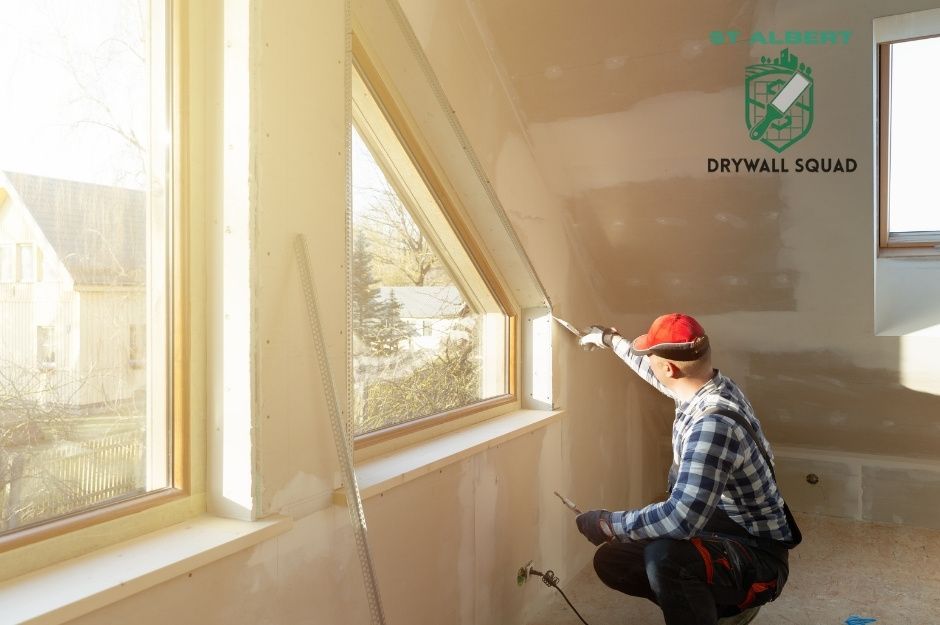
St. Albert Drywall Squad delivers professional attic drywall installation services for homeowners across St. Albert, AB. Our team specializes in transforming underused attic spaces with clean, code-ready drywall work that supports insulation upgrades, renovations, and new functional layouts. Whether you're finishing a loft-style room or preparing the area for efficient storage, we install each board with precision and care.
Attic environments bring unique installation challenges—tight angles, fluctuating temperatures, and structural transitions that require the right skills and materials. Our crew uses tools like a T-square for accurate cuts, a screw gun for secure fastening, and proper corner bead to reinforce every edge. We combine technical expertise with a steady hand to ensure your attic integrates smoothly with surrounding framing and mechanical systems while maintaining durability and energy efficiency.
If you’re planning an attic upgrade or preparing the space for installation work, call 587-854-3775 or fill out our online form to get started. For broader project planning, you can also visit our parent page for
drywall installation servicesto see how this attic work fits into your overall build.
St. Albert Drywall Squad (SP)
Comprehensive Attic Drywall Solutions in St. Albert
Your attic space requires specialized drywall techniques that address moisture control, fire safety, and structural challenges. Professional installation ensures proper vapor barriers, insulation coordination, and building code compliance for lasting results.
Attic Drywall Installation Services
Your attic drywall installation requires careful planning to address unique environmental conditions. The process begins with moisture assessment and proper ventilation evaluation.
Pre-Installation Requirements:
- Structural inspection and load assessment
- Electrical and HVAC system coordination
- Insulation placement verification
- Vapor barrier installation check
Professional installers measure and cut drywall panels to fit around roof angles and support beams. They ensure proper spacing for thermal expansion and coordinate with existing framing systems.
Installation Process Steps:
- Material delivery and staging
- Panel cutting and preparation
- Fastener placement according to code
- Joint preparation for finishing
Your installation timeline depends on attic size and complexity. Standard residential attics typically require 2-3 days for complete installation.
Attic Wall Installation Techniques
Your attic walls demand specialized techniques due to sloped angles and irregular dimensions. Contractors use precise measuring tools to ensure accurate cuts around roof lines.
Wall Installation Methods:
- Knee walls: Vertical sections under sloped rooflines
- Gable walls: End walls with triangular peaks
- Dormer walls: Protruding window sections
Each wall type requires different fastening patterns and joint sealing approaches. Your installer coordinates panel placement to minimize waste and maximize structural integrity.
Moisture-resistant drywall is essential for attic walls exposed to temperature fluctuations. This material prevents warping and mold growth in challenging conditions.
Technical Considerations:
- Proper stud spacing verification
- Electrical outlet coordination
- Window and door opening preparation
- Corner bead installation planning
Attic Ceiling Installation Best Practices
Your attic ceiling installation presents unique challenges with angled surfaces and limited access points. Professional techniques ensure proper attachment to roof trusses and rafters.
Ceiling panels require strategic lifting equipment due to overhead positioning. Installers use specialized lifts and bracing systems for safe installation.
Ceiling Installation Requirements:
- Truss spacing verification (typically 16" or 24")
- Proper screw penetration depth
- Joint staggering for strength
- Fire-rated materials in required areas
Your ceiling must accommodate recessed lighting, ventilation fans, and access panels. Pre-planning these penetrations prevents installation delays.
Quality Control Measures:
- Level verification across spans
- Fastener pattern inspection
- Gap measurement between panels
- Surface preparation for finishing
Attic Board Hanging and Sheetrock Installation
Your board hanging process requires systematic panel placement starting from corners and working outward. Professional installers use laser levels to maintain consistent alignment.
Hanging Sequence:
- Ceiling panels first
- Full wall sheets
- Partial pieces and cuts
- Corner and edge pieces
Proper fastener selection ensures long-term stability. Your installer chooses screws based on panel thickness, framing material, and local building codes.
Sheetrock installation in attics demands attention to expansion gaps and joint placement. Temperature variations require specific spacing tolerances between panels.
Installation Standards:
- Screw spacing: 12" on ceilings, 16" on walls
- Edge clearance: 1/4" from floor surfaces
- Joint offset: Minimum 4' between panel ends
- Corner treatment: Metal or paper beading
Your finished installation provides the foundation for taping, mudding, and final surface preparation.
Specialized Attic Board Types and Install Methods
Attic environments require specific board types that address moisture, fire safety, and sound transmission challenges. Proper selection and installation techniques ensure long-term performance and code compliance in these unique spaces.
Moisture-Resistant Board Installation
Moisture-resistant drywall contains water-repelling additives in both the gypsum core and paper facing. This board type prevents degradation in humid attic conditions where temperature fluctuations create condensation risks.
Installation requires modified techniques for attic applications. You must seal all joints with moisture-resistant compound and apply primer before finishing. Standard fastener spacing decreases to 8 inches on center for walls and 6 inches for ceilings due to potential moisture expansion.
Key installation steps include:
- Pre-drilling holes in dense areas to prevent cracking
- Using corrosion-resistant screws rated for humid environments
- Applying continuous vapor barrier behind board placement
- Sealing electrical penetrations with approved caulking
The green-tinted board typically measures 1/2 inch or 5/8 inch thickness. You'll find this material essential for attic bathrooms, storage areas above kitchens, or spaces with HVAC equipment that generates humidity.
Fire-Rated Board Install for Attics
Type X fire-rated drywall contains glass fibers and other additives that slow fire spread. Building codes often require this material in attics adjacent to garages, furnace rooms, or shared walls in multi-family structures.
Installation specifications differ from standard board hanging. You must use 1-5/8 inch Type S screws spaced 12 inches on center maximum. Fire-rated installations require complete coverage without gaps exceeding 1/8 inch at joints.
Critical installation requirements:
- Stagger board joints by minimum 24 inches
- Fill all penetrations with fire-rated compound
- Install continuous coverage without breaking fire barrier plane
- Use only approved electrical boxes rated for fire assemblies
The 5/8 inch thickness provides one-hour fire rating when properly installed. Your attic framing must support the additional weight, which exceeds standard 1/2 inch board by approximately 30 percent.
Soundproof Board Install for Noise Control
Sound-dampening drywall incorporates viscoelastic polymers between gypsum layers to reduce noise transmission. This specialized board proves valuable in attics converted to bedrooms, offices, or entertainment spaces above occupied rooms.
Installation requires specific techniques to maximize acoustic performance. You must avoid rigid connections that transmit sound vibrations. Use resilient channels or sound isolation clips to decouple the board from framing members.
Acoustic installation methods:
- Install sound-rated insulation between joists before board placement
- Stagger joints to prevent sound flanking paths
- Seal perimeter gaps with acoustic caulking compound
- Double-layer installation increases sound reduction ratings
The 1/2 inch thick acoustic board typically provides STC ratings of 45-50 when properly installed. You can achieve higher ratings by combining with standard drywall in double-layer applications or adding mass-loaded vinyl barriers.
Attic Framing, Preparation, and Insulation Integration
Proper attic framing establishes the structural foundation for drywall installation while coordinating with insulation systems and moisture barriers. Strategic preparation ensures seamless integration between structural elements and thermal performance requirements.
Attic Framing and Drywall Board Tie-In
Your attic framing system requires precise alignment to support drywall installation across irregular ceiling angles and wall transitions. Standard 16-inch or 24-inch on-center spacing provides adequate support for most attic applications.
Critical framing elements include:
- Header reinforcement around access openings
- Blocking between joists for drywall edges
- Furring strips on sloped ceiling sections
- Corner backing at wall intersections
You need additional blocking wherever drywall sheets meet without landing on existing framing members. This prevents sagging and creates secure attachment points for screws or nails.
Sloped attic ceilings often require furring strips to create consistent attachment surfaces. Install these perpendicular to existing rafters at 16-inch intervals to support your drywall boards properly.
Vapor Barrier and Board Preparation
Your vapor barrier installation must occur before drywall hanging to prevent moisture infiltration into insulation cavities. Position the barrier on the warm side of your insulation system with the reflective surface facing the heated living space.
Install 6-mil polyethylene sheeting continuously across framing members. Overlap seams by 6 inches and seal with vapor barrier tape. Cut precise openings around electrical boxes and seal gaps with acoustical sealant.
Preparation steps include:
- Stapling barrier every 6-8 inches along framing
- Sealing penetrations with compatible sealants
- Testing continuity before drywall installation
- Marking stud locations through the barrier
Proper vapor barrier preparation prevents condensation issues that can damage both insulation performance and drywall integrity over time.
Spray Foam Insulation and Board Prep
Spray foam insulation requires specific preparation techniques before drywall installation in your attic space. Allow foam to cure completely and trim excess material flush with framing faces using a sharp knife.
You must protect electrical wiring and fixtures during foam application. Cover junction boxes with tape and ensure foam doesn't interfere with required clearances around heat-generating components.
Key preparation requirements:
- Trimming foam flush with studs and joists
- Protecting electrical components during application
- Maintaining proper clearances around fixtures
- Creating smooth surfaces for drywall attachment
Spray foam creates excellent air sealing but requires careful preparation to ensure your drywall boards lie flat against framing members. Uneven foam surfaces can telegraph through finished drywall and create visible imperfections.
Attic Renovation, Access, and Finishing Expertise
St. Albert Drywall Squad delivers comprehensive attic transformation services that maximize your home's potential through expert drywall installation, strategic access solutions, and professional finishing techniques. Our 13+ years of experience ensures proper moisture control, fire safety compliance, and seamless integration with existing structures.
Attic Renovation Drywall Services
Attic renovation drywall requires specialized techniques to handle unique challenges like sloped ceilings, limited access, and temperature fluctuations. You need moisture-resistant board installation to prevent humidity damage and fire-rated board placement for safety compliance in converted spaces.
Your attic's structural elements determine the drywall approach. We install boards around existing framing while ensuring proper vapor barrier integration. Attic framing tie-in services connect new walls to roof structures securely.
Temperature variations in attic spaces demand specific board types and installation methods. Our team selects appropriate materials based on your space's intended use. Soundproof board installation becomes essential when converting attics to living areas above bedrooms or quiet zones.
Attic Remodel Wall and Access Install
Attic access wall installation creates functional entry points while maintaining structural integrity. You receive custom solutions for staircase openings, pull-down ladder access, or walk-up entries that comply with building codes.
Wall installation in remodel projects requires careful planning around existing utilities and insulation. We coordinate attic insulation and board prep to ensure thermal efficiency remains intact. Your new walls integrate seamlessly with original construction.
Access modifications often involve removing existing materials and installing new framing systems. Attic remodel wall install services include header installation, load distribution planning, and proper finishing around openings. Each access point receives appropriate trim and hardware for long-term durability.
Finishing Install for Attic Spaces
Attic finishing install transforms raw spaces into functional rooms through systematic drywall application and preparation work. You benefit from our experience with challenging angles, knee walls, and dormer installations that require precise measurement and cutting.
Ceiling installation in attic spaces presents unique challenges with angled surfaces and limited maneuvering room. We execute attic ceiling installation using specialized techniques for board positioning and fastening in tight spaces.
Attic board hanging requires strategic sequencing to minimize joint visibility and ensure structural attachment. Your finished surfaces receive proper texture preparation and joint compound application. Our finishing process includes all necessary sanding and priming for paint-ready surfaces.