
Bathroom Installation in St. Albert, AB
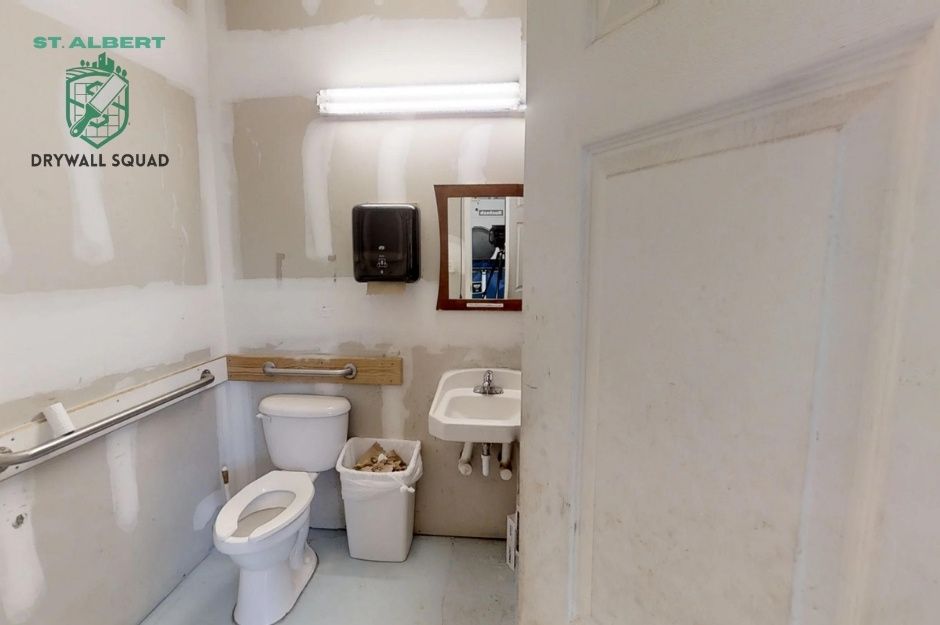
St. Albert Drywall Squad delivers professional bathroom installation services built for Alberta’s climate and the constant moisture demands of modern wet rooms. Our team handles everything from tub surrounds to full steam-ready assemblies, giving homeowners in St. Albert a reliable way to upgrade or remodel with confidence.
Bathroom spaces fail when materials aren’t installed correctly, so we approach every project with technical discipline and the right tools for the job. From setting moisture-resistant backer boards to securing framing with a screw gun, aligning cuts with a T-square, and trimming clean transitions with corner bead, we build each layer to manage humidity, prevent mould, and maintain long-term structural integrity. You get a bathroom that performs as good as it looks—one designed to withstand years of heavy use.
If you’re ready to start your bathroom installation, call 587-854-3775 or fill out the online form. Our team will walk you through the best moisture-resistant and waterproof options for your space and prepare your project for a smooth transition into the detailed steps below.
St. Albert Drywall Squad (SP)
Essential Elements of Bathroom Installation
Proper bathroom installation requires specialized techniques and materials designed to withstand high moisture levels and frequent use. The foundation of any successful bathroom project lies in selecting appropriate moisture-resistant materials and implementing proper installation methods for walls, ceilings, and specialized drywall products.
Moisture Resistant Installation
Moisture control forms the backbone of every bathroom installation project. Standard drywall materials fail quickly in high-humidity environments, leading to mold growth, structural damage, and costly repairs.
Proper moisture barriers include:
- Vapor barriers behind shower areas
- Waterproof membranes around tub surrounds
- Sealed joints at all penetration points
Your bathroom remodeling project requires specific moisture-resistant techniques at critical areas. The space behind toilets, around windows, and near ventilation fans needs extra attention to prevent water infiltration.
Professional installation involves applying moisture-resistant primers before final finishes. This extra step creates an additional protective layer that extends the life of your bathroom renovation.
Bathroom Wall Installation
Wall installation in bathrooms demands precision and specialized materials. Regular drywall cannot withstand the constant moisture exposure typical in bathroom environments.
Key installation considerations include:
Area Material Type Installation Method
Shower walls Cement backer board Mechanical fasteners + adhesive
Tub surrounds Moisture-resistant drywall Proper spacing from fixtures
General walls Green board or standard with primer Standard installation with moisture barriers
Your wall installation must account for fixture placement and plumbing locations. Proper backing behind towel bars, toilet paper holders, and grab bars prevents future wall damage.
Sealing all penetrations where pipes enter walls stops moisture from traveling behind the wall surface. This step protects the structural elements of your home during bathroom remodeling projects.
Bathroom Ceiling Installation
Ceiling installation requires special attention to ventilation integration and moisture management. Bathroom ceilings face unique challenges from steam and humidity that rises during showers and baths.
Ventilation fan placement affects ceiling installation methods. The drywall around fan housings needs proper sealing to prevent air leaks that reduce ventilation efficiency.
Moisture-resistant ceiling materials perform better than standard drywall in bathroom applications. These materials resist sagging and maintain their structural integrity when exposed to humid conditions.
Proper insulation above bathroom ceilings prevents condensation problems in attic spaces. Your installation should include vapor barriers on the warm side of the insulation to control moisture movement.
Green Board Installation
Green board provides enhanced moisture resistance compared to standard drywall. This specialized drywall features a treated paper facing that resists moisture absorption and mold growth.
Green board installation follows standard drywall techniques with important modifications:
- Reduced fastener spacing for better holding power
- Moisture-resistant joint compound for all seams
- Proper gap spacing around tub and shower areas
Your bathroom renovation benefits from green board in areas that experience moderate moisture exposure. It works well for general wall areas but requires cement backer board behind direct water contact zones.
The material cuts and installs like regular drywall but offers superior performance in humid conditions. Proper finishing with moisture-resistant primers maximizes the protective benefits of green board installation.
Specialized Wet Area Solutions
Wet areas in bathrooms require specialized installation techniques to prevent water damage and ensure long-term durability. Professional installation of moisture barriers, enclosures, and steam-resistant materials protects your investment while creating functional spaces.
Tile Backer Installation
Tile backer boards provide the essential moisture barrier your bathroom walls need before tile installation. Cement backer board and fiber cement panels offer superior water resistance compared to standard drywall in wet areas.
Your bathroom remodeling project requires proper substrate preparation. The installation process involves cutting boards to fit around plumbing fixtures and electrical outlets. Boards attach directly to wall studs using appropriate fasteners spaced every 8 inches on center.
Waterproof membrane application goes over the backer board seams and corners. This creates a continuous barrier that prevents water penetration behind your tile work.
Backer Board Type Water Resistance Best Use
Cement Board Excellent Shower walls
Fiber Cement Superior Steam areas
Foam Board Good Tub surrounds
Proper installation prevents costly repairs down the road. Seams require mesh tape and appropriate sealants to maintain the moisture barrier integrity.
Shower Enclosure Installation
Shower enclosure installation demands precision framing and waterproofing techniques. Your shower walls need proper framing with 2x4 or 2x6 studs spaced 16 inches on center to support tile and fixtures.
Vapor barriers install between the studs and backing material. This prevents moisture from reaching the framing lumber and insulation. The barrier extends from floor to ceiling with overlapping seams sealed completely.
Shower pan preparation involves sloping the subfloor toward the drain. A pre-slope creates proper drainage before the waterproof membrane installation. The membrane continues up the walls at least 6 inches above the curb height.
Backing material installation follows waterproofing completion. Green board or cement backer provides the surface for your tile installation while maintaining moisture resistance throughout the enclosure area.
Tub Surround Installation
Tub surround installation protects walls from water damage while providing an attractive finish. Your surround extends at least 6 inches above the tub rim on all sides touching the fixture.
Moisture-resistant backing installs first to create the proper substrate. This includes green board drywall or cement backer depending on your specific application needs. Backing material must be level and properly fastened to wall studs.
Waterproof membrane application covers all seams and corners before finish material installation. The membrane creates a continuous barrier preventing water penetration behind your surround materials.
Finish options include:
- Tile surrounds with proper waterproofing
- Acrylic panel systems for easy maintenance
- Natural stone applications with sealed surfaces
- Fiberglass units for budget-conscious projects
Proper caulking and sealant application at all joints maintains the water barrier integrity. Regular maintenance keeps your surround functioning properly for years.
Steam Room Installation
Steam room installation requires specialized materials and techniques to handle high moisture and temperature conditions. Your steam room walls need vapor barriers, proper ventilation, and steam-resistant finish materials.
Vapor barrier installation becomes critical in steam applications. Heavy-duty plastic sheeting or specialized membrane systems prevent moisture penetration into wall cavities. All seams require complete sealing with appropriate tapes and sealants.
Insulation placement goes between the vapor barrier and exterior walls. This prevents condensation issues while maintaining temperature control within the steam environment.
Cement backer board provides the ideal substrate for steam room applications. Standard green board cannot withstand the extreme moisture conditions present in steam rooms.
Ventilation requirements include exhaust fans sized appropriately for the cubic footage. Steam rooms need both exhaust and fresh air intake to prevent moisture buildup in surrounding areas.
Finish materials must withstand continuous moisture exposure. Porcelain tile, natural stone, and specialized steam room panels provide appropriate surface options for these demanding applications.
Advanced Installation Upgrades
Premium drywall installations for St. Albert bathrooms require specialized moisture barriers, strategic wall partitions, and waterproof systems that exceed standard building requirements. These upgrades transform basic bathroom renovations into long-lasting, professionally-sealed environments.
Waterproof Panel Installation
Cement board and fiber cement panels provide superior moisture protection compared to standard green board installation. These panels resist water penetration for 25+ years when properly installed with appropriate sealants.
St. Albert Drywall Squad installs waterproof panels using corrosion-resistant screws spaced 8 inches on center. Each panel receives continuous sealant application along all edges and penetrations.
Installation specifications include:
- 1/2-inch cement board for wall applications
- 5/8-inch fiber cement for high-moisture areas
- Vapor barrier placement behind all panels
- Mesh tape and modified thinset for seams
The panels accept tile adhesive directly without additional primer. They maintain structural integrity in temperatures from -40°F to 180°F.
Remodel Installation
Bathroom renovation projects require selective demolition and moisture assessment before new drywall installation. Existing wall cavities often contain outdated vapor barriers or inadequate insulation.
Pre-installation steps include:
- Moisture meter readings of existing framing
- Mold inspection and remediation if needed
- Electrical and plumbing rough-in verification
- Insulation upgrade to R-13 minimum
New drywall installation incorporates blocking for grab bars and reinforcement for wall-mounted fixtures. Heavy vanities and medicine cabinets require 2x6 backing installed during the rough framing stage.
Remodel projects benefit from sound dampening between rooms using resilient channels or double-wall construction. This reduces noise transfer by 10-15 decibels compared to standard installation.
Partition Installation
Non-load bearing partitions create separate spaces for toilets, showers, and vanity areas within larger bathrooms. These walls require moisture-resistant framing and specialized joint treatment.
Standard partition construction uses 2x4 framing with 16-inch on-center spacing. Metal studs work better in high-humidity environments because they resist warping and shrinkage.
Partition specifications:
- Bottom plate caulked to subfloor
- Top plate secured to ceiling joists
- Electrical boxes sealed with vapor-rated covers
- Insulation installed for sound control
Half-height partitions for shower areas require cap finishing with bullnose trim or tile edging. Full-height partitions need ceiling integration that maintains the moisture barrier continuity.
Wet Area Installation
Shower enclosures and tub surrounds demand waterproof installation techniques that prevent moisture infiltration behind finished surfaces. Proper wet area preparation eliminates future mold and structural damage.
Wet area preparation includes:
- Sloped pre-pan installation for shower floors
- Corner bead application with waterproof compound
- Primer application on all drywall surfaces
- Membrane installation over joints and corners
Green board installation provides basic moisture resistance for areas outside direct water contact. Purple board offers enhanced mold resistance for zones within 3 feet of water sources.
Wall penetrations for shower valves and tub spouts require oversized holes filled with waterproof sealant. Each penetration gets a protective collar that extends 2 inches beyond the fixture footprint.
Unique Installations and Small Bathroom Solutions
Specialized bathroom installations require expertise in both soundproofing techniques and space-efficient design strategies. Small bathroom renovations demand creative solutions that maximize functionality without compromising quality.
Soundproof Installation
Soundproof drywall installation creates privacy and reduces noise transfer between rooms. This specialized technique involves installing multiple layers of materials including sound-dampening insulation, resilient channels, and acoustic-rated drywall panels.
Key soundproofing materials include:
- Mass loaded vinyl barriers
- Acoustic insulation batts
- Double-layer drywall systems
- Staggered stud construction
The installation process requires precise measurement and careful sealing of gaps. Sound transmission class (STC) ratings typically improve by 10-15 points with proper soundproof installation. Green board or cement backer board works effectively behind tile in soundproofed wet areas.
Your bathroom renovation benefits from reduced noise from plumbing, ventilation, and water usage. Professional installation ensures proper vapor barriers remain intact while achieving acoustic goals.
Small Bathroom Installation
Small bathroom installation maximizes limited square footage through strategic drywall placement and material selection. Recessed niches, built-in storage alcoves, and custom partition walls create functional space without expanding the room's footprint.
Space-saving installation techniques:
- Recessed medicine cabinets
- Built-in shower shelving
- Corner storage niches
- Partial partition walls
Moisture-resistant materials like green board and cement backer prevent long-term damage in compact spaces with limited ventilation. Proper installation includes vapor barriers and adequate spacing for plumbing access.
Tub surround installation in small spaces often requires custom cuts and precise measurements. Waterproof panel installation provides seamless coverage while maintaining the room's proportions. Steam room installation becomes possible even in smaller areas with proper moisture control and ventilation planning.